Spray Paint Baby, One More Time

A few weeks ago, I shared my upgrade of an ugly patio set into something lovely and cheerful with a can of spray paint.  Well, after I finished that project, I had just the tiniest bit of Exotic Sea paint left in the can and a plan to upgrade something else in our house.  With this (from ModCloth) as my inspiration, I crossed my fingers that I wouldn’t run out of paint mid-project (again):

I already owned the clock to be transformed:  a wedding shower gift that we hung in our first apartment but just couldn’t find the right place for in our new home (and color scheme).

The first step was to disassemble the clock, which wasn’t as simple as I expected it to be.  In case you have a clock similar to this one, you should know that the hands of the clock will come apart from the clock mechanism – so don’t freak out when they do.  They’ll go back together when you’re done.

Since the surface I wanted to paint was smooth, I decided to lightly sand it with fine grit sandpaper to help the spray paint adhere a little better.  I don’t think this is necessary, and I’m not even sure if it did anything, but it was a just-in-case measure that only took about 30 seconds.  The scratched-up surface is completely concealed by the glossy painted finish on the final product, in case you’re wondering.

After that, I set up my spray painting station.  That is, I laid a piece of newspaper on top of a pile of rocks that acted as a little pedestal for my clock, so I could get all around the sides without having to lie on the ground.  Here she is after about 1.5 coats:

As in my inspiration image, I wanted the hands of the clock to match the outside, so I taped them to another piece of newspaper and sprayed them that cheerful turquoise color as well.

It took literally every drop of paint from that can, but I somehow had just enough to finish my project.  I celebrated my victory, and then waited about a day for everything to dry and harden completely before reassembling it and enjoying my final product, which I think is a pretty good copycat of the spendier ModCloth version.

And here she is playing nicely with our melted crayon art in the living room:

Total money spent:  $0

Total time spent:  30 minutes (plus drying time)

A (Late) Summer Treat

We’re having a bit of a relapse of gorgeous, warm weather here, and it’s reminded me of a recipe I want to share:  homemade popsicles.  For most people, this will be strictly a warm-weather treat, so hopefully you still have a few of those days left before the chill of fall sets in, or maybe you live somewhere that’s sunny and warm all the time.  In that case, you can make these in February and think cheery thoughts for us northerners enduring the winter’s blizzards.

These popsicles are super easy to make.  All you need are a few basic ingredients and some kind of popsicle mold.  I bought one about two years ago for a few dollars, but you could also use small paper or plastic cups and wooden popsicle sticks.

Homemade Fruit & Yogurt Popsicles

Makes:  4 popsicles

  • 8 oz. vanilla yogurt (any flavor will work)
  • 1/3 cup diced kiwifruit (or other fruit)
  • 1/4 cup fruit juice, or enough to reach desired consistency/quantity (I used a combination of orange and freshly-squeezed mango)
  1. Mix all ingredients together in a bowl.
  2. Pour mixture into popsicle molds, add extra juice to fill line, if necessary.
  3. Freeze until solid.
  4. Enjoy!
This recipe is quick, easy, inexpensive, healthy, and really delicious – how much better can it get?  Of course, you can make popsicles without the yogurt (or the fruit, for that matter), but it makes them so much smoother and creamier, so I definitely recommend adding it.  You could even add more yogurt and decrease the amount of juice, if you want an even smoother texture. 

There are about a million other variations you could do of this popsicle by simply changing the fruit or the flavor of juice or yogurt. I’m thinking strawberry-kiwi for next time, although it will probably have to wait until next summer.  If the cold has already set in where you live, but you don’t want to wait to make these, I say go for it.  Who says you can’t eat a popsicle with mittens on?

By the way, we enjoyed these refreshing popsicles after eating this scrumptious, summery meal:

Yep, that’s a BLT…with an egg.  You have to try it; it’s amazing!  Oh, and that sandwich just happens to be on homemade bread.  I did it!  And I found out it’s not as scary as I thought.  I’ll be back soon to share the details.  Until then, let’s all go eat something summery, just for kicks.

Pleats, Pockets, and Pins

Anyone been missing me lately?  Or my posts, at least?  Here’s the (partial) scoop on where I’ve been:

1.  I became an adult.  That is, I got a job, and I subsequently learned that jobs have much in common with vampires in their tendencies to suck lives away.  It’s not a bad job, but let’s just say it’s not my dream job, either, so there are definitely other ways I’d like to be spending my time…which leads me to:

2.  I’ve been working diligently on a project that I’ve been trying to complete for several years now, and it is finally nearly finished.  I hope to be able to announce it here soon, not because it’s necessarily “blog-related”, but it’s certainly “my-life-related”, so why not, right?

3.  I still have to sleep, and there are only so many hours in the day (24, to be exact).

My point is, in the words of Bryan Adams:  Please forgive me.

I’ve still been crafting and cooking and taking plenty of pictures along the way, so all will be shared eventually, perhaps when my husband allows me to quit my job and spend my days creating lovely, simple things and sharing them (WARNING:  extreme exaggeration ahead) with my millions of followers.  Or, probably more likely, I’ll simply share them at a glacial rate over the next several months.

And now, as a reward for your patience (in waiting for this blog post, as well as reading all of my rambling up to this point), I present my latest sewing project:

I dearly hope that you have enough confidence in me to know this already, but for those of you who are unfamiliar with my impeccable fashion sense (read:  I can dress my self in the morning), I will make it clear:  THIS IS A BEFORE PHOTO.

I bought this large, shapeless dress for $3 at a Goodwill.  I had originally wanted to cut it up and make a throw pillow or two, but when we put up apple/lime green curtains in our living room, that plan was quickly thrown out. Instead, I decided I would remake the baggy dress into a skirt.  The photo above is actually the first step in the process:  deciding where to cut (the second step if you include brainstorming with my mom and sister to decide on a shape for the skirt).  I used a necktie to secure the dress where I wanted it to sit at my natural waist and adjusted the dress until it was the length I desired.  Then I pinned the waist (while the dress was still on) where I would need to cut.

I then laid the dress flat, lined up the hemline at the bottom, smoothed out any wrinkles, and measured from my pins to the hemline.

I don’t remember what the length was, but I used that measurement (plus about a 1/2″ – 5/8″ seam allowance) to keep my cut straight, just moving the tape measure across as I cut from one side to the other.

The dress I used had a zipper running down the back, and because it was long enough, I decided to keep part of it for the skirt so that I wouldn’t have to worry about sewing on a new one.  As you can see below, I cut all the way across the dress except for the zipper, which I cut through at the end using craft scissors (rather than the sacred sewing scissors).

If you do this, make sure to pin your zipper open (I safety pinned the zipper pull to the skirt).  Otherwise, your zipper pull might come off and you’ll have no way to fix it except to sew on a new zipper.  Major bummer.

Once you have your skirt cut out, you can make the waist band.  Start by cutting off another section of the dress all the way around.  To decide the width of this piece, take your desired waistband width, multiply by two, and add 1/2 to 1 inch for seam allowances.  As for mine, I cut a four inch wide strip and ended up with a 1 1/2″ waistband.  If applicable, I highly recommend completing this step at your mother’s house, where you can use all her fancy gadgets, like this really nice rotary cutter. Otherwise, scissors and a tape measure will do just fine.

The next step is to cut your waistband to the correct length.  If you plan to add a button closure like I did, you’ll need to add an inch to your waist measurement, plus another 1/2 inch for – you guessed it – a seam allowance.

After you finish the waistband, you’ll need to round up some interfacing.  This will help keep the waistband laying flat rather than bunching up or looking flimsy when you wear your skirt.  Cut a strip of interfacing to the same length as your freshly cut waistband and half of its width.

Now comes ironing.  First, iron your waistband in half lengthwise, insides facing in (how it would be on your skirt).  Next, unfold the waistband and fold and iron one edge 5/8″.  This half of the waistband will be facing the inside of your skirt, so plan accordingly if you want a particular side to show.  Lastly, iron your interfacing onto the other half of the waistband.  If this all sounds confusing, hopefully this picture will help:

If you’re still following me, take your waistband over to your sewing machine. Fold it the opposite way as your ironing (so the good sides are facing in) and stitch up both ends 1/4 inch from the edge.  Flip it back to right-side-out, and you should have something that looks like a waistband (or at least a strip of fabric with finished ends).  You’re now ready to pin it onto your skirt.

This step will be a little different for everyone, depending on the shape you want how much extra fabric you have.  Because I started with a large dress, I had plenty of fabric to pull into pleats, but I also had existing seams in the back that meant I couldn’t add pleats there, because they wouldn’t lay right with the seams.  Your situation may be different, but I’ll share mine anyway.

I ended up doing two inverted pleats in the front and a little pleat at each side seam.  My process was as follows:  pin the skirt to the waistband (starting in the back around the zipper, then the center-front), try it on, decide what to adjust, and repeat.  It took awhile, but I ended up with a shape I really like, so it’s definitely worth the effort.  I forgot to take a photo of my pinned pleats, but here’s one of the waistband pinned to the back of the skirt (with a 1″ flap for the button), along with some safety pinned zipper action:

My next step is one I would consider optional.  With plenty of encouragement from my mom, I decided to add pockets.  It takes a little extra time, but it isn’t too tricky and is definitely worth it.  Seriously, who doesn’t love pockets in a skirt?  Your boyfriend/husband will appreciate the extra effort, too, when he doesn’t have to carry your lipgloss in his pocket.  Here’s how you do it:

1. Draw a pocket-like shape (with a flap on the end – see photo – for a seam allowance) on paper, and use this as a pattern to cut the pocket out of whatever fabric you choose.  You’ll need four pieces.  I pinned two layers together and cut them out at the same time so that I only had to trace and cut the shape twice.

2. Rip out the side seams on your skirt as far down as you want the pocket to go.  To figure out the length, I held my arms at my sides, slightly bent, and had someone else put a pin in the side seam at the bottom of my wrist where it would naturally rest at the lower edge of a pocket.  You could also use another skirt that has pockets already to determine the placement.

3. Flip your skirt inside-out and pin your pocket pieces in place (any raw edges should be facing in).  If you have two layers pinned together like I did, separate them first and pin them to the skirt individually.  After that, you can sew each pocket piece (along that little flap) to the skirt where you ripped out that seam. But first, double-check to make sure everything’s going the right direction so you don’t end up with a pocket on the outside of your skirt or something. Then, after you have them sewn to the skirt, pin the two pocket pieces back together with your side seam lined up.  It should look something like this:

4.  Sew.  Starting at the lower edge of the pocket (closer to the bottom of the skirt/the left side of the photo above), sew along the existing seam, toward the pocket.  When you have sewn about 1/4″ onto the pocket (right where that blue pin is on the left side of the photo), turn the fabric and sew along the outside of the pocket.  Finally, finish sewing up the side of the skirt where you ripped the seam out earlier.

Now, if you flip it back to right-side-out, you should have a skirt with pockets (yay!) pinned to a waistband.  Let’s sew on that waistband, shall we?

You should have an ironed seam right down the middle of the waistband. Fold that over to see how the waistband fits around the skirt.  The inside edge (which should be ironed up 5/8″) should fit around and cover the top, raw edge of the skirt.  If it does, then go ahead and sew the waistband where you have it pinned.  If the waistband doesn’t cover the raw skirt edge, move your pins down a little and then sew, or simply sew a wider seam allowance than you have pinned.

Once you have the outside of the waistband sewn on, you can hand stitch the inside.  Using a simple whip stitch, sew the inside edge of the waistband to the rest of the skirt so that your waistband lays flat.  If you added an extra length of waistband for attaching a button, sew that flap closed, too.

After that step, you’re pretty much done!  All you need is a closure for the back.  If you’re doing a buttonhole closure, stitch/cut your buttonhole onto the short end of the waistband, near to the edge, and sew your button onto the extra flap that you added earlier.  If you don’t want a button or don’t have a buttonholer on your machine, you can use a hook and eye closure instead.

And you’re finished!  Now go model that beautiful creation (the skirt and yourself!).

I wore mine out for a day of (grocery) shopping followed by a photo shoot in a field.

It was an absolutely gorgeous day, perfect for a happy, flowery yellow skirt.

And then a giant spider landed on me.

Okay, the spider was tiny, but it did land on me.

Here’s a shot of the back, so you can see the closure – not so I could put a picture of my butt on the internet, if you were wondering.

I’d love to see your version of this skirt, if you decide to make one and manage to follow my tutorial.  Please let me know if you have any questions.  I really love my new skirt, and I can’t wait to wear it with a sweater and boots now that the weather is showing clear signs of my favorite season:  Fall!

Yep, that one was pretty much so that the last thing you saw wasn’t a picture of my butt.  You’re welcome.

Total money spent:  $3

Total time spent:  3 hours
Linked up at:

Spray Happy

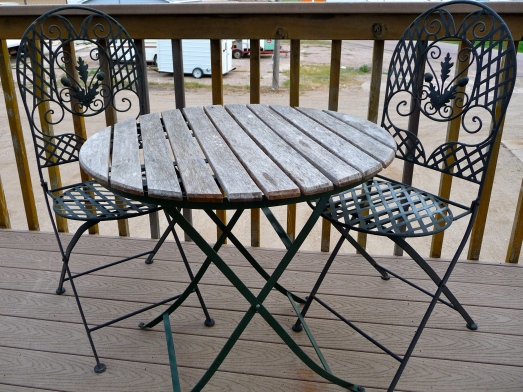
I think it was Aerosmith that once said:  “Spray on, spray until your dreams come true.”  …Or something like that.  And, let me tell you, I had big dreams, involving a good deal of spraying, for this little beauty eyesore that we found on Craigslist for forty bucks:

More specifically, my dream involved taking the grungy black chairs and mismatched green table legs from boring/ugly to beautiful, glossy, and happy. On a side note, I also have dreams of living in an apartment with a deck that doesn’t overlook a gravel alley/parking lot with random trailers parked in the background, but we have to tackle one thing at a time.  I’m all about baby steps, remember?

I will now introduce you to my trusty assistant on this project, Mr. Exotic Sea by Valspar:

I had considered going with red or yellow, but when I went to Lowe’s to check out the options, this guy caught my eye right away.  I brought just one can home (Mistake #1), because I wasn’t sure how much it would take, and then the fun began.

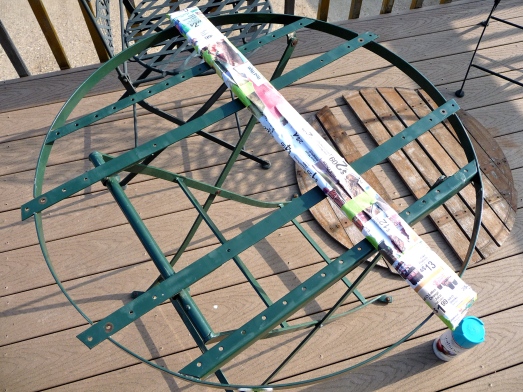
First, I wiped down the chairs and the metal table legs with soapy water and let them dry…for approximately 3 days, while I waited for a nice enough day (not too humid or windy) to paint them. Then I set to work unscrewing the wood slats from the metal base.  I had thought about just covering the tabletop with a trash bag, but then I realized that the metal parts that showed through between the slats wouldn’t get painted and would have looked really strange still being dark green.  If this is confusing, the pictures later should help, so keep reading.  My next step was to take a fancy one-handed picture of myself unscrewing the wood slats, just in case any of my readers forgot what it means to unscrew something.  I am now going to show you this picture; please feel free to pretend that it is in some way helpful.

Finally, after much time spent unscrewing, I reached this point:

“Wait,” you say, “it’s not finished!”

Au contraire, my friend.  It was finished.  That last slat of wood wasn’t going anywhere.  It had a stripped screw that I simply could not get out.  I tried pliers, Vise-Grips, a square head screwdriver, and my sheer force of will, but nothing so much as made the thing budge.  Note:  After this incident, I came across a tip for removing stripped screws that suggested putting a wide rubber band between the screw and the driver…if anyone has the chance to try this, let me know if it works! 

So, what do you think I did next?  I’ll tell you:  I gave up.  Yep.  I let the stupid piece of wood win, but before it had a chance to gloat, I smothered it in newspaper (that sounded a little violent, sorry).  Here’s what I mean:

I covered the wood with newspaper and tape, trying my best not to block any of the metal that I wanted to paint.  Then I drug the whole set down onto the gravel (I guess there is an advantage to our current landscaping, after all) and got to painting.

Here’s what the chair looked like after the first thin (and sort of even) coat of Exotic Sea:

Not much of a looker yet, I know.  I let the first one dry while I worked on the second chair, trying to spray everything that would be visible when the chair is sitting out (it folds up, which would make the bottom of the seat visible, but that’ll probably only happen when it’s being stored over the winter, anyway – so I didn’t worry about that).

After that, when the chairs were mostly dry (but still sticky, because I’m a little impatient), I started on the second coat, making sure to get into all the little nooks and crannies.  Want to know where Mistake #1 comes into play?  Right here.  After finishing the first chair, I ran out of paint.  So, I let the chairs dry completely, and then hauled everything back onto our deck to wait until I’d have a chance to get more paint.  Of course, when I went back to Lowe’s they were out of one color of spray paint.  The color?  Exotic Sea.  Needless to say, our deck situation was a little embarrassing for awhile with that half-finished patio set lurking in the corner sitting smack dab in the middle.

Are you wondering what Mistake #2 was yet?  Well, I didn’t have any latex gloves laying around, so I went bare-handed.  Here’s why that was a mistake:

And that was after I washed my hands.  Spray paint doesn’t come off easily, which is great for our patio set, but not so great for my hands, which stayed that way for a few days.  Luckily, I came up with a better plan for the next round of spray painting.

My husband told me a few weeks ago how to work our charcoal grill (as if I’m ever going to grill something when he’s not here), and he explained his method for retrieving charcoal from the bag without turning his hands all black:  a plastic grocery bag “glove”.  Genius, right?  At least I thought so.  I borrowed the idea for spray painting, and it worked like a charm.

I’ll spare you the boring details of painting the rest of the set.  The gist of it is: spray as thinly and evenly as you can to avoid drips, apply two to three coats, and spray everything that’ll be exposed.  Do all that, and you’ll end up with something beautiful like this:

The cheery aqua color makes me smile every time, especially in that glossy finish (as opposed to the chalky texture the metal had before).  In case you’re wondering, those cushions came with the set, too.  As far as the tabletop goes, I think we’re going to leave it how it is.  We considered staining/painting/whitewashing it, but it’s in good shape and won’t take so much upkeep as the other options might (especially because it sits outside all the time).  I also really like the mix of the modern and bright aqua with the rustic wood.

And it’s a good thing I painted underneath those wooden slats, huh?

Anyone else been spray painting things lately?  Did you also not buy enough paint or turn your hands blue for a week?  I highly recommend the high-tech plastic-bag-glove technique, if you’re considering it.

Total money spent:  $7.18 (+$40 for the patio set)

Total time spent:  roughly 3 hours of active time

Accessor-ease

I’ve always said that good hair is the best accessory.  It makes literally any outfit look better.  So, what about good hair that’s also well-accessorized?  Even better.  If you, like me, have grown tired of bobby pins and boring headbands and you want a solution that you can make in ten minutes while watching tv – here it is.  Oh yeah, and it’s free, as long as you have some scrap fabric laying around.

My initial inspiration came from this sweet headband (from here):

And then there was this one (from here):

I love the casual look of the knit fabric mixed with the sweet flower.  For mine, I decided to use an old pair of black, patterned tights (apparently I have a thing for sewing with tights), but you can use any stretchy fabric you have around (an old t-shirt would be perfect).

I cut a long strip from the tights and trimmed it until the length and width were right (i.e. lots of holding it up in the mirror, trimming some more, holding it up again).  Then I stitched the short ends together with a loose basting stitch so it would gather (like you see in the first photo above).

I apologize for the awful photo showing this step.  While I’m at it, I also apologize for not having photos of the other steps at all.  Really, it’s so simple you don’t need them.  If you do, that’s okay, just google different combinations of:  fabric, flower, rosette, tutorial … until you find one you like.

The next thing I did was cut another long strip out of the tights, about an inch or so wide.  The length will depend on how big you want your flower to be, but you can always add another strip on later if you don’t have enough. Then I began twisting, gathering, and stitching the fabric into a coil-like flower, sewing it directly onto the gathered part of the headband as I went along.  Your process for making the flower will depend on whether you want a messier-looking flower or a nice and neat little rosette, or something in between.  If you’re nervous about messing up, you can try out a few different methods before sewing it onto your headband, but I find that the best part about rosettes is that they’re so hard to mess up!  Even the messy ones look cute, and no one will know if you didn’t intend for it to look that way.

Here are a few shots of how mine turned out:


Nothing like a quick project to liven up your hair wardrobe, eh?  I think I’ll be making another one in red to support a certain favorite team of mine. Happy crafting!

Total money spent:  $0

Total time spent:  10-15 minutes

Pizza, Take Two

Lookie what I picked up at the grocery store recently:

Bread flour, for making bread!  And yeast, for making bread…that has yeast in it!

“But wait,” you’re thinking, “isn’t this post supposed to be about pizza?”

Why, yes, you are absolutely right.  Being the chicken that I am, I decided, after picking up 5 pounds of bread flour, that pizza, rather than bread, might be the better/easier way to go for my first venture into making all things yeasted (yeasty things?).  So, I picked out a pizza crust recipe, and, what do you know:  it called for bread flour, which happened to be sitting lonely in my cupboard, waiting for me to find some courage and bake a loaf of bread already.  Baby steps, baby steps.

This recipe comes from the cookbook that my grandmother compiled from the recipes of her friends and family when she left her amazing store, called Apple Core, after 21 years of selling home decor, delicious homemade goodies, and other treasures.  My grandma makes beautiful rosettes (like these) and the most incredible pancakes in the world, so I figured if this recipe made her book, it was worth a try.  Plus, it was dubbed by its creator:

Perfect Pizza Crust

Makes:  1 large pizza

  • 1 T. active dry yeast
  • 1½ cups warm water (110° to 115°)
  • 2 T. sugar
  • ½ t. salt
  • 2 cups bread flour
  • 1½ cups whole wheat flour
  • cornmeal
  1. In a large bowl, dissolve yeast in warm water.  If you don’t have a thermometer, ask your mom what to do use water that feels warm to the touch, but not hot.
  2. Add sugar, salt, 1 cup of bread flour, and whole wheat flour.  Beat until smooth.
  3. Stir in enough of the remaining bread flour to form a soft, sticky dough.  Turn onto a floured surface and knead until smooth and elastic, about 6-8 minutes.
  4. Place dough in a greased bowl, turning once to grease the top. Cover and let rise in a warm place until doubled, about 1 hour. Optional: take a walk around town, happen across a rummage sale, and come home with two pillows, a shirt, and a glass jar, all for $1, to find your dough perfectly risen.
  5. Punch dough down and roll/spread onto a greased pizza pan or a pizza stone dusted with cornmeal.  Add toppings.
  6. Bake at 425° for 10-15 minutes or until crust is golden brown and toppings are lightly browned and heated through.

I told you when I made the no-yeast pizza crust that I would one day attempt a yeast crust and bring you my comparison of the two, so here it is:

Yeast.  Do it.

Most of you probably already know this, but it never hurts to have one more on the yeast team, right?  Now, I’m not saying I’ll never make the other variety again, because sometimes you just need to be able to throw something together quickly, but if you have the time and ability to plan ahead, this crust is the way to go.

This crust has that perfectly golden, toasted outside with the soft and chewy inside that you’d get at a restaurant, except that it’s better, like pretty much everything else you make yourself.  It’s not much more difficult than the no-yeast variety, either; it simply requires more time.  Is it worth it? 

Just try to look that pizza in the eye at that soft, golden (and delicious-smelling) crust and say it’s not.

It’s Done! (For real this time.)

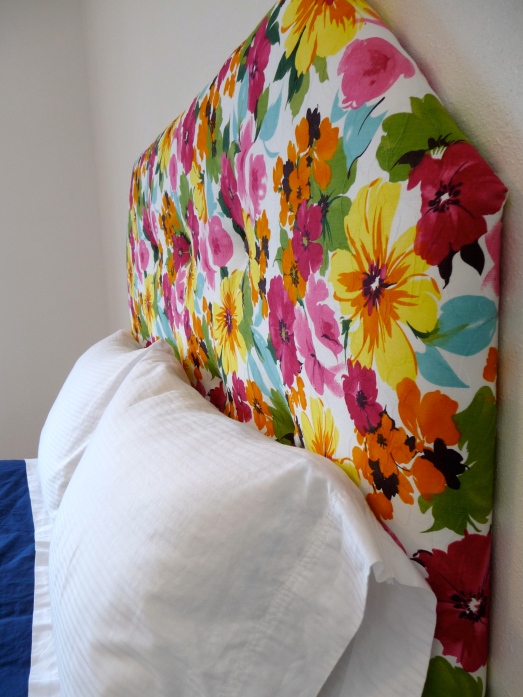
Remember eons two weeks ago when I revealed our lovely headboard? And then I asked you to vote for whether or not I should tuft it?  And then I left you hanging for what seemed like forever?  Well, the wait is over. Miss Headboard is back, and she’s got a whole new attitude.

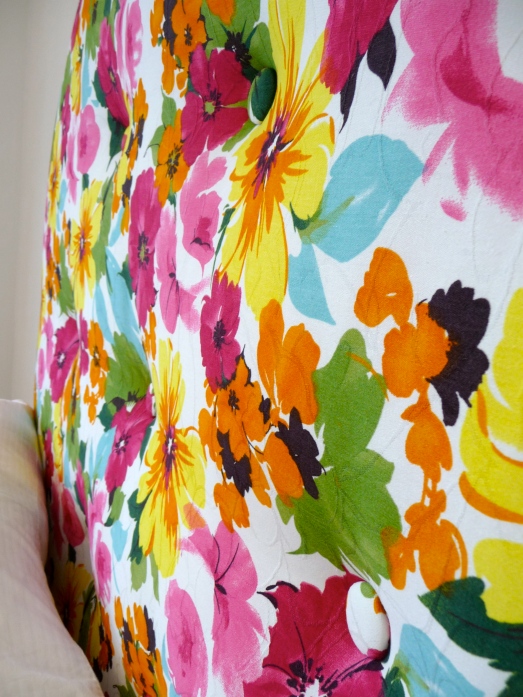
What’s that?  You don’t see the new ‘tude?  That’s probably because, as it turns out, Miss Headboard is a little camera-shy.  You see, while the tufting looks great in real life, it’s really hard to see in photos.  Try not to hold it against her.

Let’s talk about how the tufting came to be.  Enter these guys:

I actually had 3 boxes of refills and 1 box that included the button covering kit (those little blue and white circles at the bottom of the picture).  The instructions on the box explained how to cover the buttons, which was a really simple process.  It took about 15 minutes to cover 10 buttons with the leftover fabric from the headboard.

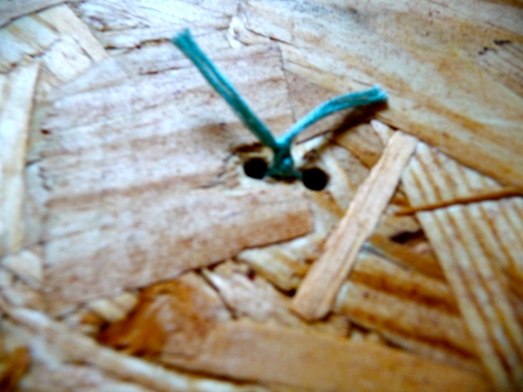
Do you remember how we drilled 20 little holes in the sheathing that makes up the back of the headboard?  This is where those come in to play.  I threaded a 2″ needle with embroidery thread and stuck it straight down into one of those holes in the back.

I used that little piece of tape to make sure I didn’t pull the thread all the way through.  It’s definitely not necessary, but it doesn’t hurt either.  It’s sort of like the safety on a gun…wait, no, that’s a bad example.  Maybe it’s more like using non-stick spray on a non-stick pan.  Anyone else do that?

Once the needle poked through on the other side, I pulled it out, added a button, and sent it straight back through to the other hole.  Sometimes I had to dig around a bit for that other hole, but overall this method worked really well.

Then I pulled the thread tight from the back (pressing on the front of the button helps, too), and secured it with a few knots.

Adjusting the tension (or how deep the buttons sat in the headboard) – and keeping it the same for all of the buttons – was the trickiest part of this project.  If you have a friend to help with this, one of you can push on the button while the other ties the knots.  With my friend (husband) being occupied (watching television), I came up with a different solution. I leaned the headboard forward (upholstered side down) until the button was resting on my kneecap (while I was squatting) and then tied the knots.  With the help of gravity and the weight of the headboard, all my buttons ended up at about the same depth.

And that’s all it takes to tuft.

Admittedly, the effect of the tufting is pretty subtle compared to the impact Miss Headboard made right away with her bold colors and pattern, but we’re really glad we went through with it.  She looks so…finished, now.  And check out those curves:

Did you see them that time?  Try this one:

Anything?  Maybe I need to have a talk with Miss Headboard about camera etiquette.

Total money spent:  $8.82

Total time spent:  1 hour

Melted Crayon Art

Perhaps I should begin this post by introducing you to my mom, also known as Her Ladyship Craftiness…er, Her Royal Craftiness?  I’m still working on the title.  Regardless, she’s the coolest, most creative and talented woman I know.  She can make pretty much anything.  At least once during high school, I borrowed a friend’s purse, brought it home to Mom, and she whipped one up just like it for me.  Yes, I probably abused the power of being Her Ladyship’s daughter, and I no longer steal my friends’ purses, but the point is:  my mom is awesome.  And she came to visit this weekend.

If you follow Young House LoveBower Power, Making a House a Home, or Style by Emily Henderson you know how timely her visit was, as today is the big reveal for the Pinterest Challenge.  So, this weekend, with Super-Mom by my side, I set out to create this (from here):

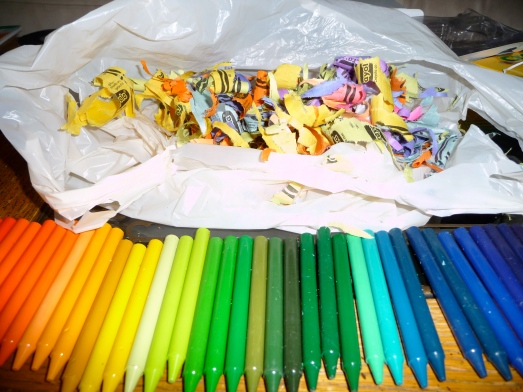
The supplies were pretty simple:  canvas, crayons, and hot glue.  We used a 64-count box of crayons and supplemented with a few extras from a 24-count box (to replace the browns and grays we had rejected) and arranged them into a pattern we liked.

The next step was to peel off the paper labels from all 60 crayons.  This was not fun.  We could have left the labels on, but I, unfortunately, preferred the more natural look without them.  Did I mention that this was not fun?

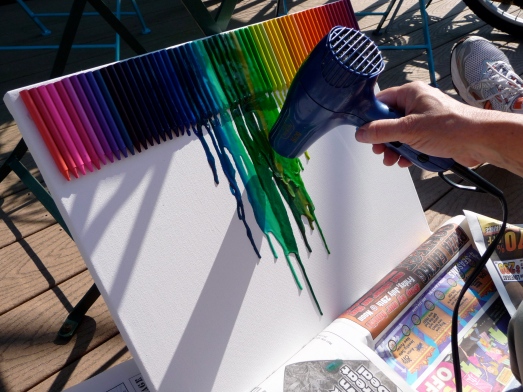
We glued all the crayons to the top of the canvas (pointing down) with a single strip of hot glue from a high-heat glue gun, let it dry for a few minutes, then re-glued a few loose crayons.  Finally, we set our crayon-covered canvas in our car that was sitting in the sun to heat up a bit, setting the canvas up at an angle, in case anything decided to drip down. After about a half hour inside a hot car, the crayons had begun to “sweat”.  That’s when we took matters into our own hands and broke out our super-secret weapon:  my hairdryer from seventh grade.

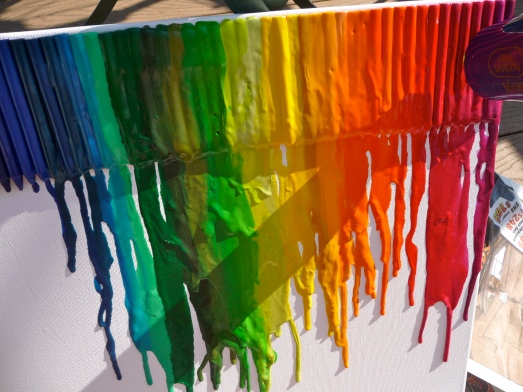
It worked like a charm.  Melting all the crayons took a while, but Mom and I took turns with the hairdryer in the 90-something degree heat.  I might have had to change my shirt because of all the sweat…more than once.  But it was worth it.

What do you think of our masterpiece?  We were pretty psyched about how well it turned out.  Mom’s now itching to make one of her own (since she let me keep this one), and I’m even planning to try a different variation of the project someday.  I just love all the bright colors!

Total money spent:  $9.60

Total time spent:  about 1½ hours

Did any of you complete the Pinterest Challenge?  I’d love to see your projects, too, so feel free to leave a comment with a link to your own.

A No-Buttermilk Solution

While I love the taste, low cost, and satisfaction that come with cooking and baking from scratch, it often involves a lengthy list of ingredients, some of which I don’t keep on hand.  Sure, I’ve got the basics:  flour, eggs, pasta, chicken broth, and more than a handful of spices…but buttermilk?  Not so much.  While buttermilk can be easily frozen (in 1 cup amounts, or whatever amount you usually use at one time) and thawed to use later, sometimes we’re still left without that important ingredient and no one to blame but ourselves – or the person who was supposed to buy more buttermilk.

Don’t sweat it.  As I promised last week, there’s a simple solution for the lack of buttermilk.  Here it is:

Lemon juice or vinegar + milk.

Technically, this makes sour milk, which is a replacement for buttermilk, but it’s much simpler than making real buttermilk.  I found that making your own buttermilk is possible, but it requires either cultured buttermilk as a starter or another ingredient that I rarely have in my fridge:  heavy cream.  Therefore, I’m sticking with the sour milk method.

Sour Milk/Buttermilk Replacement

Makes:  1 cup

  1. Place 1 T. lemon juice or vinegar in a measuring cup
  2. Add enough milk to fill to 1 cup total liquid; stir
  3. Let mixture stand for 5 minutes before using
Easy peasy.  Now you don’t have to be angry at your designated buttermilk-buyer when you run out in the middle of making a cake.  You can make this in any amount, as long as you keep the same ratio of lemon juice/vinegar to milk.  Happy baking!

Breakfast, Twice

Breakfast is my absolute favorite meal.  This is perhaps because the experts say it should be your biggest meal of the day, so I feel no guilt loading up on eggs, fruit, and my favorite food group:  carbs.  Yum.  It could also be because I always wake up starving, my stomach immediately growling for a bowl of cereal.  Anyone else here go to bed already thinking about breakfast?  It can’t just be me.

In honor of my favorite meal, I’m here to share two simple forms of homemade fruit + carb deliciousness, neither of which are required to be consumed in the morning.  At my house we affectionately call that “brinner.”  Yep, breakfast for dinner.  And as much as I love breakfast in the morning, brinner really is a beautiful thing.  Don’t you think?

Whole Wheat Waffles

Makes:  about 8 belgian waffles

  • 1 1/3 cups whole wheat flour
  • 4 t. baking powder
  • 1/2 t. salt
  • 2 t. sugar
  • 1 t. cinnamon
  • 2 eggs, separated
  • 1/2 cup butter or margarine, melted
  • 1 3/4 cups milk
  • 1 t. vanilla
  1. In a large bowl, whisk together dry ingredients
  2. Add egg yolks to dry ingredients, place egg whites in a small mixing bowl
  3. Beat whites until moderately stiff, set aside
  4. Stir butter, milk, and vanilla into dry ingredients
  5. Fold in egg whites
  6. Pour batter into hot waffle iron
While your waffles are cooking, you can make this:

Strawberry-Peach Syrup

Makes:  about 1 1/2 cups

  • 1 1/2 – 2 cups of sliced fruit (mine was about 1/2 strawberries and 1/2 peaches, but you can use any combination of these or other fruits)
  • 3/4 cup water
  • 1/3 – 1/2 cup sugar (depending on the fruit you use and how sweet you want the syrup to be)
  • 1 T. brown sugar
  • dash cinnamon (optional)
  • 1 t. cornstarch (optional)
  1. In a small saucepan over medium heat, combine fruit, water, sugars, and cinnamon (if desired)
  2. Stir occasionally until fruit softens and mixture is heated through
  3. For a thicker syrup, mix cornstarch with a small amount of water and stir into fruit mixture
Note:  This recipe is very easy to adjust to your taste by modifying the type of fruit and the amounts of water, sugar, and cornstarch you use – it nearly always turns out well (I have to say “nearly”, just in case).
Alex loved this homemade syrup and said it was better than maple syrup or fresh (uncooked) fruit.  He even chose it over peanut butter on his waffles, which, if you know him at all, is a pretty big deal.  So, I decided to try it again the next time I was craving a carbohydrate-heavy breakfast, which is where the following recipe came into play.Whole Wheat-Buttermilk Pancakes

Makes:  8 pancakes

  • 1 cup whole wheat flour
  • 1 T. brown sugar
  • 1 t. baking powder
  • 1/4 t. baking soda
  • 1/4 t. salt
  • 1 egg, beaten
  • 1 cup buttermilk
  • 2 T. oil
  1. In a large bowl, combine dry ingredients and make a well in the center of the mixture
  2. Combine egg, buttermilk, and oil; pour into flour mixture and stir just until moistened (batter will be lumpy)
  3. Adjust to desired consistency with additional buttermilk or flour
  4. Pour about 1/4 cup of batter onto a lightly greased griddle or skillet over medium heat; cook until golden brown
And to top the pancakes…Cinnamon-Apple Syrup
  • 1 medium apple, thinly sliced
  • 3/4 cup water
  • 1/4 cup sugar
  • 1 T. brown sugar
  • 1 t. cinnamon
  • 1 t. cornstarch (optional)
  1. In a small saucepan, combine fruit, water, sugars, and cinnamon
  2. Stir occasionally until fruit softens and mixture is heated through
  3. For a thicker syrup, mix cornstarch with a small amount of water and stir into fruit mixture
Did that recipe sound familiar?  I told you it’s easy to modify!
If you’re feeling fancy, top your waffles or pancakes and syrup with a little powdered sugar or whipped cream to make them pretty.  As for me, I wasn’t feeling very fancy, just hungry.  Speaking of which, I could go for a little second breakfast right now…
P.S.  If you don’t have any buttermilk for the pancakes, don’t worry – I’ll be back soon with a quick fix for that!
P.P.S.  Been dying to know what’s going to happen with our headboard? It looks like the “tufts” have it!  I’ll share the details as soon as I finish breakfast the project.